How to conduct electrical wiring in an apartment - all stages of electrical installation
Installation of electrical wiring in an apartment is not as long and costly as installation of wiring in the house. This is due to the fact that there is no need to draw a line inside the housing, because this is provided by the developer.
The cabling in the rooms consists of the following steps:
- charting;
- calculation of the amount of necessary materials and electrical fittings;
- marking and strobing walls;
- cable mount;
- installation of sockets, switches and junction boxes;
- assembly of the input shield;
- line check by tester.
It should be noted that to date, open wiring in the apartment is no longer used, therefore, in this article we will consider installation work in a hidden way.
Charting
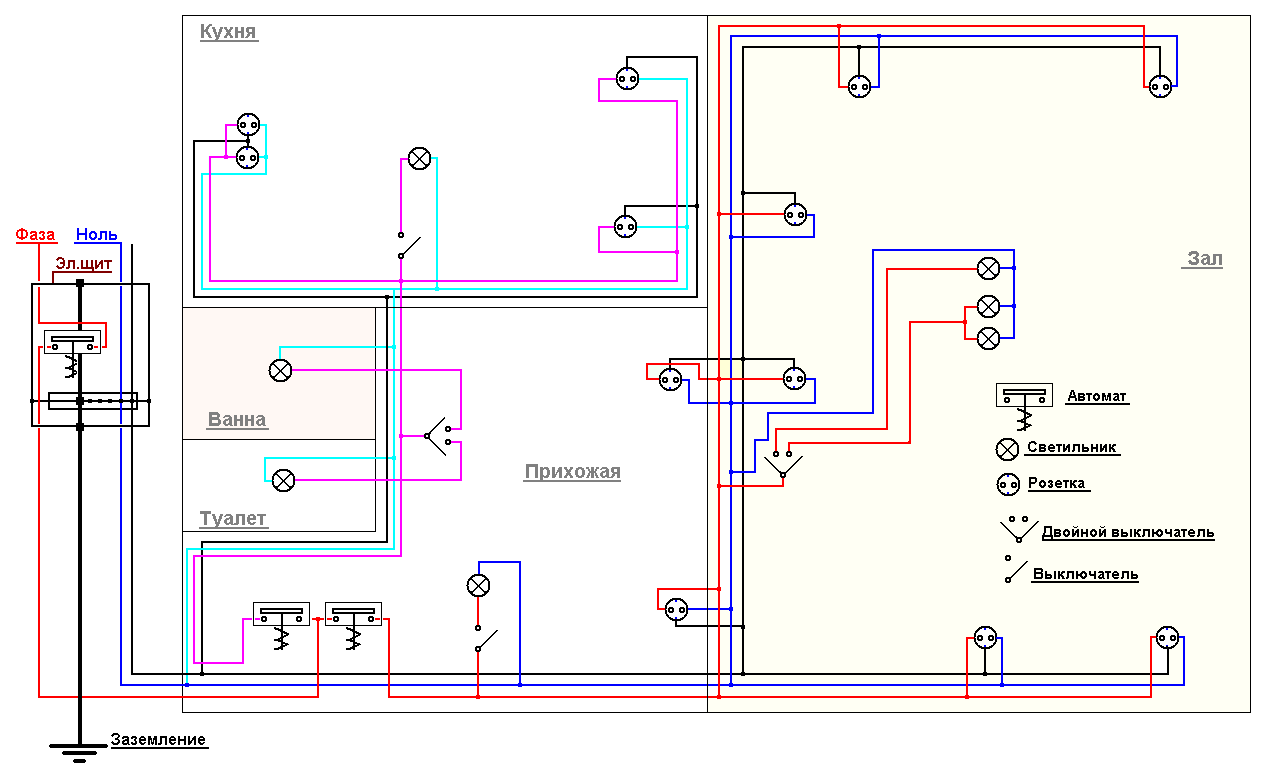
The wiring diagram in the apartment is easy to do with your own hands. To do this, it is recommended to use a photocopy of the housing plan, on which you can conveniently mark the installation location of sockets, switches, fixtures and other components. About how to make a wiring diagram before repair, we described in detail in the article: https://our.electricianexp.com/en/kak-sostavit-sxemu-elektroprovodki-pered-remontom.html. The main points are presented below.
The starting point of the scheme is the location of the distribution panel in the apartment. Usually this place is a corridor, next to the front door, at a height of about 1.5 meters from the floor.
When drawing up the scheme, we recommend that you consider the following tips, norms and rules:
- In apartments, it is forbidden to ditch load-bearing walls, as well as to make horizontal and vertical gates. We will talk about this in detail below.
- The route of the apartment wiring should be strictly vertical and horizontal along the walls. This requirement provides less chance of damage. For example, by the location of the outlet, you can find out exactly where the cable passes, so as not to accidentally drive a nail into it when you hang a picture. Ideally recommended before driving a nail. find the wire in the wall using a special device. Please note that in Khrushchev and other panel buildings, the cable is laid in the channels in the plates. Due to the stiffness requirements of which, the channels can run diagonally.
- Turning the track should be carried out only at right angles.
- It is best to draw a line in the upper part of the wall, at a distance of 20 cm from the ceiling (such a height will provide the minimum probability of mechanical damage and will not appear on the convenience of repair). Also possible post on the floor, and not the ceiling, using a special electrotechnical baseboard.
- The switches in the apartment should be located at the entrance to the room, on the side of the door handle. The height of the circuit breakers is not standardized according to GOST and SNiP, but, as a rule, is either 80 cm or 150 cm.According to the European standard, it is better to install switches lower, in addition, it will be more convenient for children to turn on the light if necessary.
- Outlets are mounted at the bottom (20-30 cm from the floor), but if necessary, can be placed at any height (for example, in the kitchen above the countertop). Recommended for 10 square meters. meters of space to install at least one outlet, and at least 1 outlet per room. In the kitchen, the number of products should correspond to the number of household appliances, at least 4 pieces are recommended. This is prescribed in SP31-110-2003, “Design and Installation of Electrical Installations of Residential and Public Buildings,” paragraph 14.27. The distance from the mounting location to the door and window should not be less than 10 cm.
- Each room must have a junction box.
- Before drafting the wiring in the apartment, carefully plan the location of household appliances and furniture. It happens that after electrical work the products can be covered with furniture, or the cords from household appliances do not reach the power source.
- The bathroom must have at least 2 sockets (one for connecting a washing machine, the second for a hairdryer). But read the article “sockets in the bathroom»About their correct location. In short, the sockets should have protective curtains or be in the area with the least likelihood of splashing.
Surely these articles will be useful to you:
Selection of hardware and automation
When choosing switches and sockets, pay attention to the method of their installation - internal or external. If you are going to install them in the socket boxes, then you need to buy only products for internal installation. To connect the wires you need to use screw or lever terminal blocks (type Wago), PPE caps or sleeves. It is also possible to make the connection by soldering or welding, but in no case by twisting (prohibited according to PUE 2.1.21). Therefore, you need to buy products for connecting wires with a margin.
Choose well-known manufacturers of circuit breakers and RCDs, IEK and KEAZ from the budget segment, and Schneider Electric, ABB and Legrand from the middle and upper.
Be sure to include in your wiring diagram RCD 30 mA, which protects against electric shock. It is recommended to install a separate 10 mA RCD for the bathroom. The RCD rating is selected higher than the machine. Let's say if the machine is 16A, the RCD is set to 25A. If the circuit breaker is 25A, the residual current device must be rated 32A, etc.
Not sure which cable to choose? So the cable must be copper. To conduct electrical wiring in the apartment with your own hands, you can choose a copper cable VVGng or NYM. These are one of the most suitable brands of wires in the domestic market. For lighting, choose a cross section of 1.5 mm.sq. and protect with a 10A machine, lay 2.5 mm.kv cable on sockets. and put the machine 16A. For electric stove connection and other powerful consumers it is better to use a cable with a cross section of 4 mm.kv. and protect with a 25A assault rifle.
If you want the wiring in the apartment to be safe, put in the shield voltage relay, which protects against overvoltage in the network as a result phase imbalance, which is often observed in old housing stock due to zero cliff.
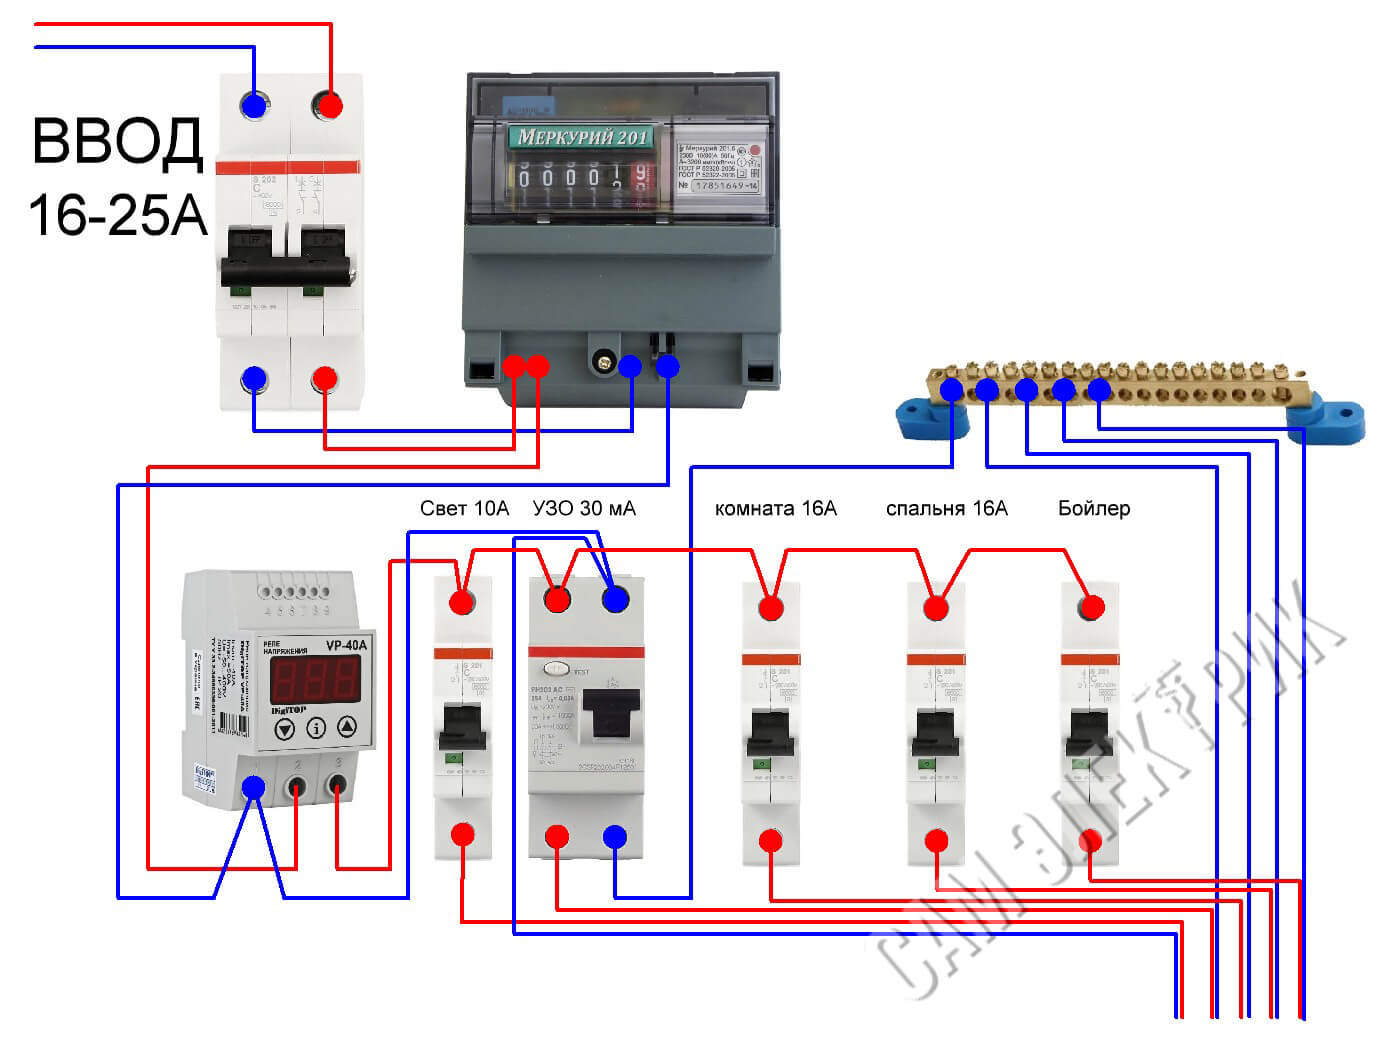
The assembly diagram of the shield can be like this (on its basis, just select the accessories):
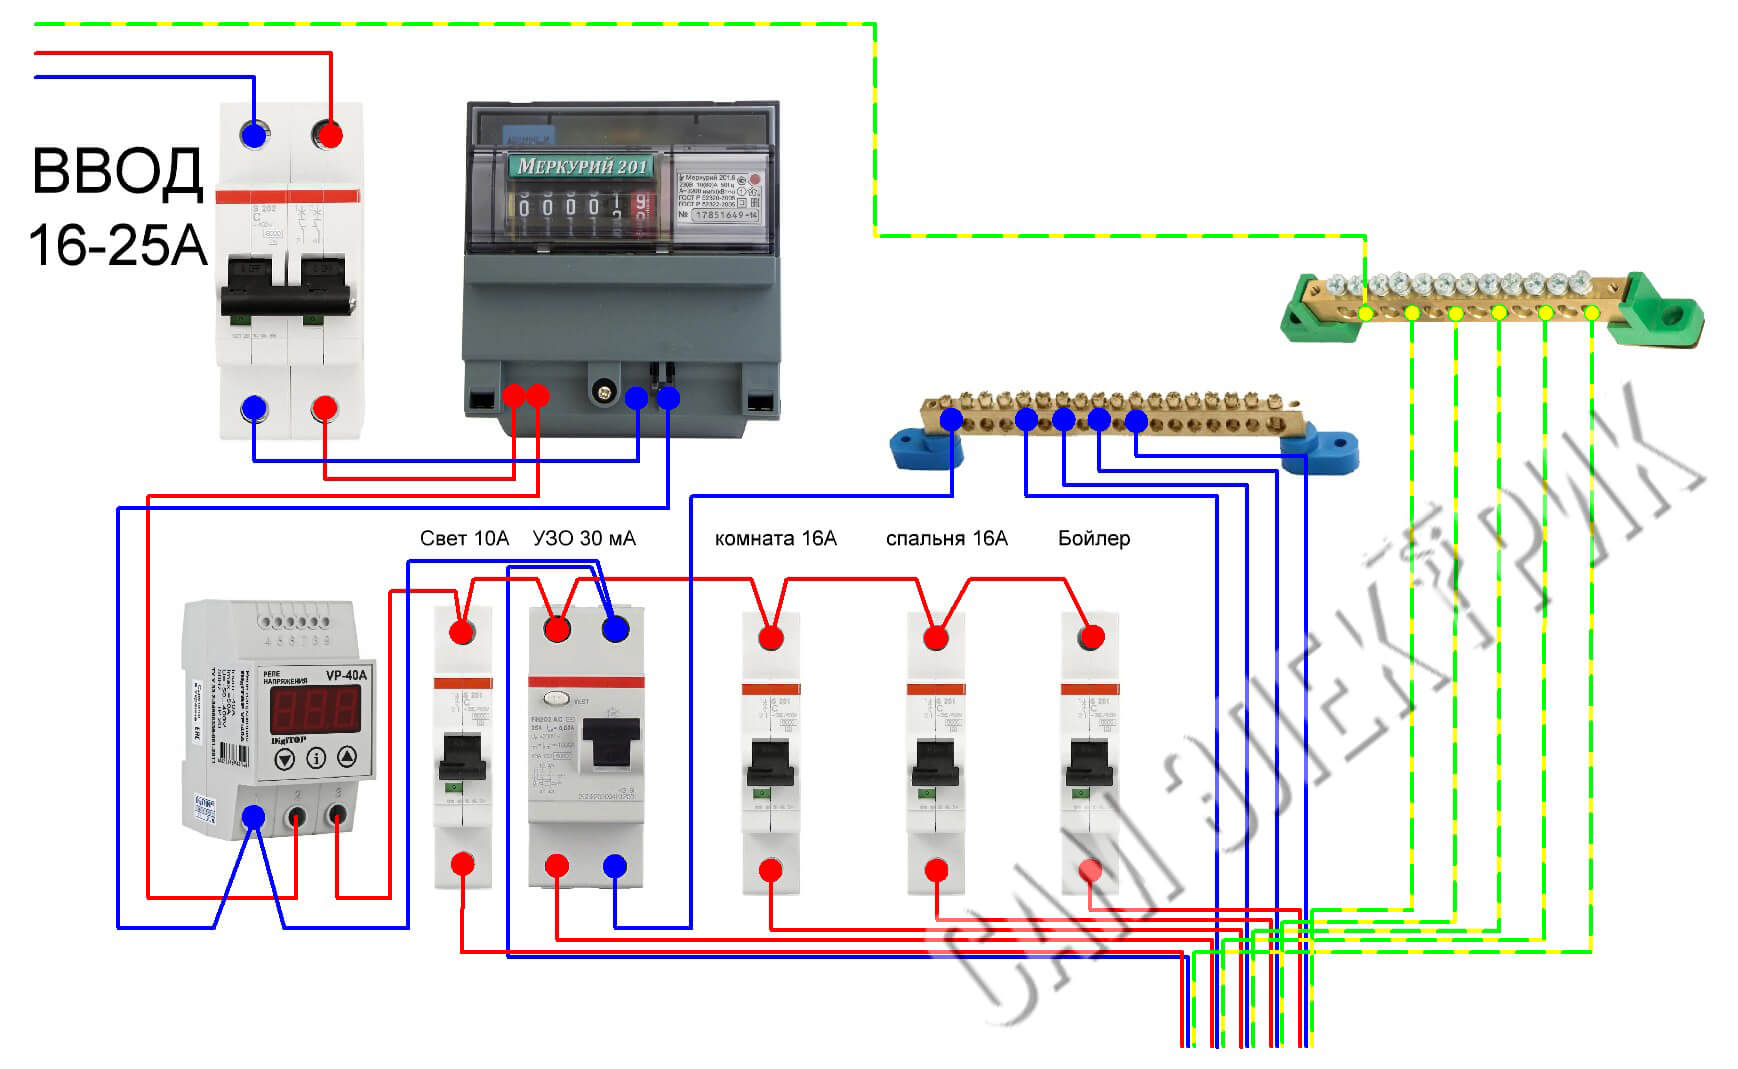
If the apartment provides grounding, the circuit will be as follows:
Wiring and requirements
The first and very important point that you should know about before starting electrical work - in panel houses (Khrushchevs) most often you can’t wall the walls according to the Resolution of the Government of Moscow of February 8, 2005 N 73-PP “On the procedure for the reconstruction of premises in residential buildings territory of the city of Moscow. " Also, according to Government Decision No. 508 (Clauses 11.3 and 11.11 of Appendix No. 1), it is forbidden to ditch load-bearing walls.
In this case, it will be rational to conduct wiring through existing channels, the floor or under the ceiling (if a suspended or suspended ceiling is planned). The first and last option is more preferable. If the wiring in the apartment changes and it is planned to sheathe the walls with gypsum board, an excellent solution would be drywall wiring.
Important! Dropping the ceiling in the apartment is strictly prohibited! The only option in which you can make strobes on the ceiling is, first of all, applying an additional layer of plaster to the ceiling, in which the cable will be hidden. This layer can already be carefully grounded without touching the monolith.
Those. the easiest option is to draw lines from the shield to sockets and switches along the ceiling, channels or floor, and there you will already have to make vertical strobes and the so-called wells for installing socket boxes.
Another important point that you should pay attention to if you decide to conduct wiring in the apartment with your own hands - noisy work allowed from 9 a.m. to 7 p.m. (except Sundays) with an hour of silence from 13 to 15! Strobing refers to noisy work and can not only cause the anger of neighbors, but also cause a fine (from 1 to 5 thousand for individuals).
We will return directly to the laying of the apartment wiring. As we said earlier, the length of the conductors must be bought with a margin. This supply will go to their interconnection (on each side the outer sheath of the cable is removed by 5-10 cm) and to the connection of sockets, switches, fixtures (length margin from 10 to 15 cm).
About how to correctly conduct wiring in the apartment, without violating the rules, is described in the video:
Connection of sockets and switches
This stage is quite simple, you need to connect all sockets and switches in the apartment. To do this, strobes are installed in the strobes and special boxes. We recommend that you "plant" these elements on alabaster, as he quickly and securely clings to the wall.
It makes no sense to write the same thing several times, so we offer a list of articles that you need to familiarize yourself with:
- How to install a junction box in the wall
- How to connect a euro outlet
- How to set the light switch
- How to connect the switch to the network
Connection of machines and RCD
The last stage of wiring in the apartment is the assembly of the input shield. According to the scheme, you must connect circuit breakers and RCDs. Difficulties in connecting these devices should not arise - the lead-in wire is wound from above, and the outlet wire to the junction box from below. About, how to connect an RCD we told. Circuit breaker connection also not be difficult, even to electric kettles. You can clearly see the installation process of these devices in the video below:
After all protective devices in the apartment are connected, it is necessary to carry out wiring continuity with a multimeterto verify the correctness of the work done. Best for these purposes, call an electrician so that an experienced specialist checks everything. Finished wiring verification services are not so expensive.If no problems are found, feel free to turn on the machine and carry out the first tests of the finished line.
Here, using this technology, electrical wiring can be done in the apartment with your own hands. We hope that the provided step-by-step instructions, diagrams and requirements have helped you to carry out the electrical installation safely, and most importantly, in compliance with all norms and rules.
Similar materials:





I liked the work of the master, the price of the issue and whether it is possible to place an order. The apartment is a new building from scratch Balashikha, 60 sq.m.
Goodnight! This is just an indicative video example. Unfortunately, we do not have the contact details for this wizard. Soon, the site will open a service to call electricians in cities, so wait for the news!
Do you know good suppliers for wiring in an apartment? That the price and quality were appropriate. Moscow city. And, if not difficult, in a nutshell for the "dummies" can you explain the difference between a differential automaton and an RCD?
Thank.
Regarding the difference between the difavtomat and RCD https://our.electricianexp.com/en/uchimsya-otlichat-uzo-ot-differencialnogo-avtomata.html
electrical wiring on the wall at a height of 15-20 cm from the ceiling - this is a long gone old (I thought I had long forgotten)!
Something but let's try to score in this place too!
The most correct today should be considered as the wiring on the floor and ceilings, well, it can be on the wall in the strobe but at the level of 40-120 cm from the floor, so that I personally do not remember something nailed down.