Step-by-step instructions for connecting an electric hob
Theoretical part.
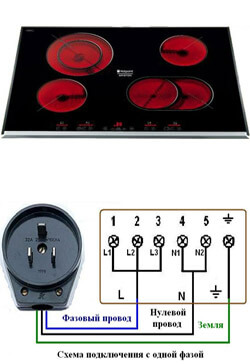
So, the electric hob is connected to a specially branched outlet with a high ground level with a capacity of 25 to 32 A. As for the wires, they must be copper, with three cores, have a cross section of at least four millimeters. However, today electrical wiring is designed to connect four-core cables. Speaking of outlets that are designed to connect hobs, they are classified as follows:
- three-contact;
- four-contact.
Of course, if you have a ready-made plug, then connecting the electrical panel is greatly simplified. But in order to connect the wire to the outlet, you need to know the specifics of this process. Suppose that the stove has 4 wires (phase, phase, zero, ground), and there are 3 wires in the wall. This indicates that the stove requires a jumper between the phases on the terminal block to connect to a three-wire cable.
So, we proceed as follows: between the black and brown wires we install a copper jumper, which is usually supplied, after which we connect one of the phases to the phase conductor of the apartment wiring (it must be black, brown, white). As for grounding conductors and ground, they remain intact.
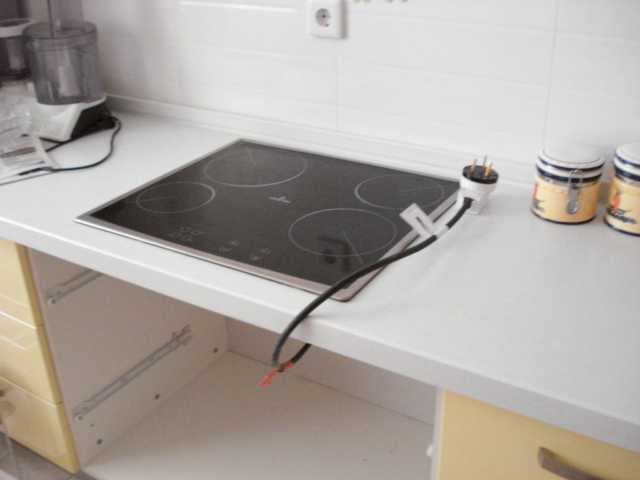
The resulting cord needs insulation. If the wires from the wall have the same color markingthen using a multimeter, determine where zero and phase are.
It is important! Disassemble the socket into which you intend to connect the electric hob, and carefully check, because in some cases there is a mismatch between the contacts and wires of the tile, as a result of which after connection it may happen that spark plugs either starts to melt.
Urgent recommendations
Consider the following DIY tips for connecting your equipment:
- Before connecting an electric hob, you must install an RCD and an automaton.
- The case must be grounded, but not to the conductor from other equipment, but to those cores that connect to the terminals from the outlet. Most manufacturers offer models that already have a protective bus for grounding, which only needs to be connected to the ground wires of the apartment wiring.
Induction cookers
An induction panel or an oven, about the installation of which we have already written, can be connected almost by analogy with a hob electric panel. Make sure there is no fundamental difference by reading the tips below, where we will talk about connecting the stove.
- To connect the hob, you can use PVA wire suitable section.
- Next, open the access panel. To do this, you need to find a rectangle on the back of the electric stove, hidden by a metal plate. Using a screwdriver, unscrew it.
- After removing the metal plate, locate the terminals. Insert the cable clamp into the hole first. The cord must be held in place by the use of clamps. This must be done so that the electric wire does not fall out. Next, run the cord through the cable clamp. Wait while tightening the screws.
- If we want connect oven outdated sample, then there we find 3 wires. The latest models should have 4: 2 - phase, 1 - neutral, 1 - ground. Their location is this: in the center there is a neutral point, on its two sides there are phase wires, under it there is a ground point. Before connecting the wires together, make sure that there is a copper strip that usually connects the grounding wires to the neutral ones. Seeing, simply eliminate it. The phases must be connected by a jumper, as we said above in the instructions for connecting an electric hob.
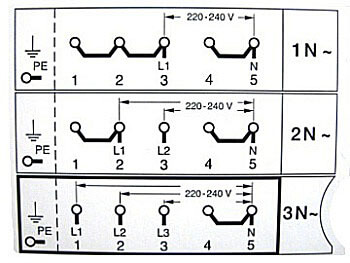
- A necessary process when connecting to a cooking electric panel is the combination of cords. Of these, black and red are phase wires, green is grounding and blue is neutral. Before connecting the wires, unscrew the connection points and connect the wire instead. First, connect the cable in green, then blue, then already remaining (red or brown from the jumper).
- Then make sure that the cord is tight. It is not desirable that it be overtightened or hung.
- The difference between the electric stove panel and the gas one is that to control the first one, a computer circuit is required, which is available in the technology of recent generations.
Please note whether the connection is firmly made, otherwise it may not be able to withstand the machine, and you will have to repair not only the device, but also all the wiring. It should also be noted that the installation of the electric hob can be done without a plug, directly to the network. To do this, draw a separate line from the junction box.
In this article, we clearly explained to you how to connect an electric hob yourself. We hope that you will carry out the assigned tasks correctly and achieve a positive result.
Also read:

