How to check the correct operation of the electricity meter yourself?
How often to check
So, if you are familiar with one of the following situations, you need to waste no time to check whether the electric meter is winding correctly in a private house or apartment:
- Electricity consumption has increased dramatically, although you use household appliances in the same mode as before. In addition, new electrical appliances were not purchased and, accordingly, connected to the network.
- The opposite situation - you are less likely to use household appliances, but the electricity consumption has not decreased (for example, during your long absence).
- Electricity consumption is very high, an order of magnitude higher than it can be in reality. For example, if in your apartment there is nothing more powerful than a kettle, and the electricity consumption is the same as that of a neighbor who uses air conditioning or an oil heater daily.
If you are familiar with the above situations, read the tips below and immediately proceed to check the meter for self-propelled and accounting error. To test the device, you will need a stopwatch, calculator, multimeter and a 100-watt incandescent lamp.
Step 1 - Check the connection
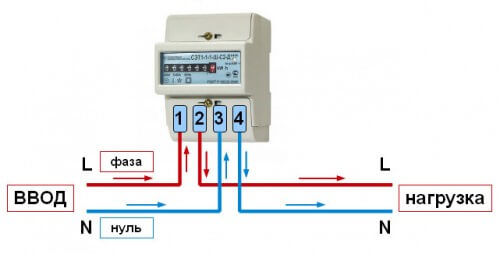
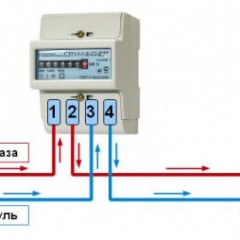
First of all, you should check whether the electric meter is correctly connected to the 220 or 380 Volt network. Single phase meter wiring diagram we have already described to you. It looks like this:
If in your case the connection does not match the example, you need to solve this problem as soon as possible. Illegal connection entails not only possible improper operation of the electric meter, but also high fines.
Important! According to the Rules for organizing electricity metering (p. 137), “The meter must have intact control seals and (or) visual inspection signs”. Unauthorized failure of the seal can lead to sanctions on its part, for example, accrual for installed capacity for the period of operation of the meter without a seal. "
Are all wires connected as needed? We proceed to a more serious check of the device - to self-propelled.
Step 2 - Make Sure the Disk Does Not Spin Arbitrarily
To check the electric meter at home for self-propelled, just turn off all the circuit breakers that are located after the meter and serve the sockets, lighting group and individual electrical appliances in the house. Circuit breakers or fuses are installed to protect the line from overload. If they are not, then you need to install to prevent emergency situations in the power consumption network. The requirement to install protection devices is specified in clause 7.1.65 of the EMP (Chapter 7.1) However, at the time of the check, in the absence of automatic devices, we simply turn off all household appliances from the outlet, and turn the light switches on to the “off” mode. We wait 10-15 minutes and perform a visual check - see if there is a blinking indicator on the front panel or the counter dial is rotating.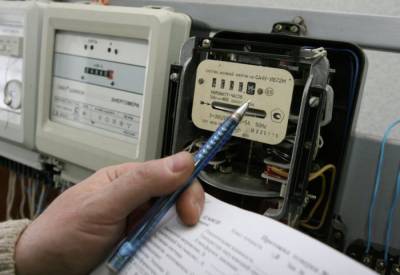
If the electricity meter is working, blinking should not occur (maximum may blink every 5-10 minutes), and the disk should stop (or make one revolution within 10 minutes). Otherwise, your electricity meter has not passed a pulse self-test and it is necessary to call a service organization that can more thoroughly check the electricity meter in the laboratory.
Step 3 - Calculate the measurement error
To check the correct operation of the electric meter, you need to calculate its metering error. To do this, you need an ordinary incandescent lamp (as a load), a multimeter, a calculator and a stopwatch. Immediately recommend reading about how to use a multimeterif you do not know this. You must use an electronic model (not a dial gauge or clamp meter).
As for the load, it is best to use a light bulb. The fact is that the power of modern household appliances can have different values when working in different modes, so it is better not to use it as a load. It is better to be guided by passport capacity, and use it in the calculations, although in fact there will be a different meaning. If even at this stage an error appears, checking the electric meter at home will not work out as it should.
So, the technology for checking for correct readings is as follows:
- Measure the voltage in the network using a multimeter. About, how to measure the voltage at the outlet, we told in the corresponding article. You are unlikely to have 220 Volts, so write down the actual value on the sheet - for example, 223 Volts.
- Measure the amperage of the lamp. To do this, put the tester into ammeter mode and connect to the bulb. For example, take the value of 0.43 A.
- Find out the actual power of the bulb - multiply the voltage by the current. In our case, 223 * 0.43 = 96 watts.
- After connecting the lamp to the network, fix the period of time during which the counter indicator flashes 10 times or the counter disk rotates 10 times. If the disk of the induction meter has made 10 revolutions in 2 minutes (120 seconds), then you can calculate the amount of electricity taken into account by the meter during this time, as follows.
- On the front panel, find the counter constant, which is measured in imp / kWh for electronic meters and rev / kWh for induction meters.
- Using the formula P = U * I, calculate the actual power consumption by the load. P = 223 * 0.43 = 96 watts.
- Find out how many watts were used up during the test period (120 seconds). This requires (89 W * 120 sec) / 3600. We got 2, 97 W-hour.
- Checking the electricity meter for an error is performed according to the calculation: "1000 * number of revolutions / A (constant, indicated on the front panel)." For example, 1000 * 10/3200 will turn out 3.13 W-hour.
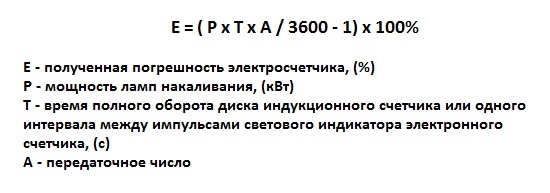
- The error of the counter can be calculated by multiplying the lamp power by the number of revolutions and by a constant (depending on the gear ratio of the counter) and divided by the number of seconds in an hour.
In our case:
E = ((0.96x12x1500 / (3600)) - 1) * 100% = 6.68%
The accuracy of the meter is determined by its accuracy class.If the accuracy class of a single-phase meter is 2.5, then the relative error should be no more than 2.5%.
Video instruction on the calculated and measuring part:
In this way, you can check the electric meter for serviceability with a multimeter at home. As you can see, the technology is quite simple and even a schoolchild will be able to cope with the calculations, not to mention the home master self-taught.
Step 4 - Checking Magnetization
Very often, Internet users ask how to check the energy meter of Energomer, Mercury or Neva for magnetization. The fact is that if you decide to stop the electricity meter with a magnet, and in your model of electronic device installed antimagnetic seal, then the check is very simple - a sticker or a special indicator changes color. As a result, when the check comes, you can easily be accused of illegal actions.
If you have a simpler model of the meter, you can check its operability after the magnet using a thin needle - if it is attracted to the panel, then the meter is magnetized. As a rule, after 2-3 days after you remove the magnet from the dial, the magnetization passes. If the problem persists, you can buy a special demagnetizer as in the photo below: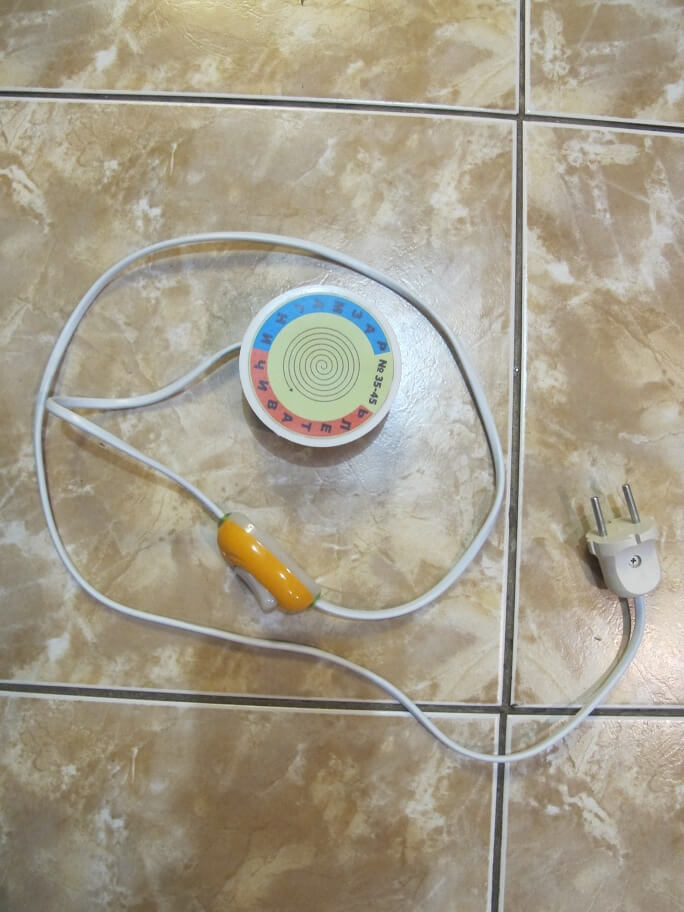
This concludes the technology for checking the meter. Now you know how to check the electric meter yourself at home and what equipment is needed for this!




So-i446 stopped spinning, but it hummed slightly. He took it off, twisted it in his hands and connected it. No buzzing. It does not respond to a 60-watt bulb. Slowly moving a 150 Watt light bulb. Moreover:
the disk spins irregularly and stops,
when disconnected from the network, the disk spins slightly back,
in different positions of the counter, the disk behaves differently.
18 years hung in the dusty garage of the cooperative. I can calibrate. I suppose the mechanics should be cleaned, but first we need the advice of a connoisseur.
Thanks in advance.
where did you get 89 watts in calculations?