Proper connection of the doorbell in the apartment
Wireless
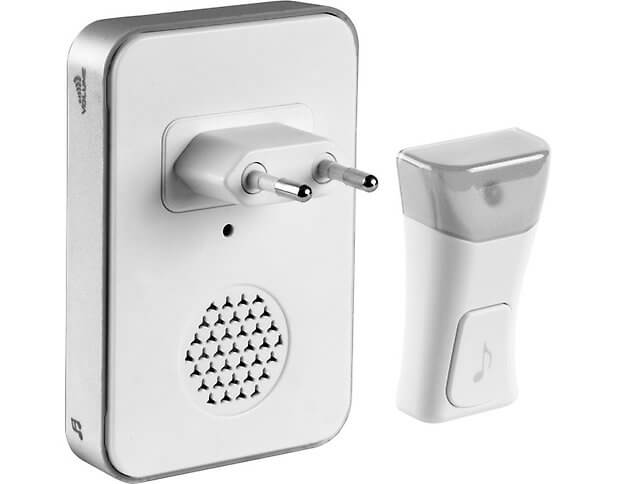
It’s easiest to connect a wireless call, as this does not require wiring. Most often, the button and the main unit operate on batteries, so all you need to do is fix all the elements to the wall. The button can be put on double-sided tape or drilled a small hole in the wall and drive a dowel-nails. The doorbell itself can also be mounted on the wall or simply put on a cabinet in a suitable room. In some models of wireless devices, the buttons operate on batteries, and the main unit must be plugged into an outlet, as shown in the photo below. In this case, there should not be any difficulties in connecting.
By the way, it is recommended to install the button at a height of 1.5 meters from the floor. This height is considered the most comfortable for turning on / off the signal. As for the optimal height of installation of sockets from a floor, we talked about this in the corresponding article.
Wired
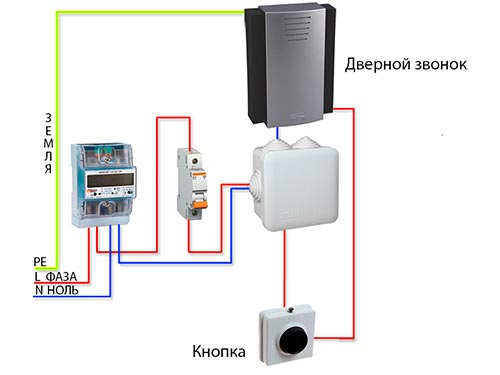
Much more questions arise if you need to connect an electric doorbell to a 220 Volt network. In this case, the steps are similar. connecting light switch - the phase starts to break to the button, and zero goes directly to the main unit. You can clearly see the wiring of the wires in this diagram:
So, if you settled in a new building or want to install a doorbell in the house, then proceed as follows:
- Choose the most suitable places to install the button and main unit.
- Disconnect the input devices on the switchboard.
- Make a hole in the wall to lay the cable that will connect the elements of the circuit. In order not to stumble on other wires during gating, we recommend that you find out how to find a wire in the wall.
- From the finished hole, slide the strobes to the installation site of the button and doorbell. You can do without this stage, if you conduct open wiring in cable channels.
- Fix all the elements on the walls, immediately remove the front cover so that you have access to the terminals for connecting wires.
- Connect zero directly to the main unit.
- Connect the button phase to the doorbell phase.
- Connect the phase from the bell to the corresponding terminal in the junction box.
- If the apartment has grounding and the same terminal is present in the main unit, be sure to ground the bell.
- Check the connection and turn on the machines on the shield. Check if the device is working.
This way you can connect the doorbell in the apartment with your own hands. Sometimes you need to replace the device and the connection technology will be slightly different.In the event of a replacement, you will see that 4 wires exit the wall to the apartment. First you need to decide which wire is responsible for what. To do this, we recommend using the indicator. About, how to use an indicator screwdriver we told in the corresponding article
So, after ringing all the cores, most likely the picture will be as follows - on one of the cores you will find a voltage of 220 V, the others will not ring. This means that from the wall go:
- phase from the network 220 (the indicator worked on it);
- zero from the network 220;
- the wire going to the button;
- wire coming from her.
To connect the call with your own hands, you first need to turn off the light in the apartment, and then connect the 1st and 3rd wires. Accordingly, you must connect the second and fourth wires to the main unit, then turn on the machines on the panel and check if the circuit works.
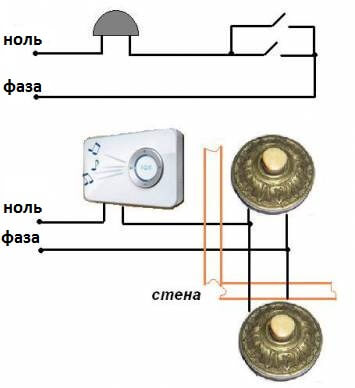
By the way, sometimes it becomes necessary to connect several buttons to one doorbell. In this case, it is recommended to connect them in parallel, as shown in the diagram below:
That's all I wanted to tell you about how to connect a doorbell in an apartment and a house with your own hands. We hope that the provided photos, diagrams and videos were clear and useful for you!
It will be useful to read:





What kind of electrician is you thinking about applying a phase to the call button?
ALWAYS ZERO ON THE BUTTON!
I do not agree with you! Maybe you think that on the light switch, a neutral wire should go to the gap, and not a phase wire?
And where did you get that zero should break?
So that where the button is out of phase. It is not safe to carry out a button with a phase
So until the switch, even if it is at “zero” the phase will still be
Of course, the phase should not go directly to the call, but only through the button. Then, when repairing, or replacing a call, there is no need to disconnect the network.
Indoors, the light switch always breaks the phase.
But zero comes to the external button of an electric bell. This is due to enhanced safety precautions. The ringer coil is a quenching current resistance. In case of damage to the button, a person receives an electric shock. The difference in receiving an electric shock from the pure phase and from the phase passing through the quenching resistance is significant.
Yes, as for me, they constantly led to a gap phase in the doorbell. You just need to wisely approach the installation and connection of the device. If the button is located on the street, it must be protected from rain, no one is safe from the damage to the button, and this rarely happens. As they say, normally do - it will be normal.
help me please. I want to take a vibro motor from an old phone and make the call vibrate when pressed. power there 3.7v. is it real
Generally it is possible but will it work ...
Good day, I have a call from the Wizard. I don’t remember which scheme I collected, but it will work 4-6 clicks and stops responding. It was necessary to remove it, it was time to put it back, I connect it as the circuit doesn’t work with the switch, as the logic also doesn’t work . “Wizard” call with 4-wire output - 2 to the switch and 2 according to the logic per button, but it does not work, help me figure it out
Wizard call connection diagram
Admin, do you think I have not seen this scheme ??? I repeat, there are 4 wires, not 2, and not 3
Most likely you have the following connection diagram. The photo is not entirely successful, it is not clear what is there and how it is connected. In any case, if you connect everything according to the scheme, but the call does not work, it means the call itself.
Hello! I bought an electric bell and a button to it. I wanted to connect, but there was a problem. From the wall at the entrance to the apartment to connect the bell button 3 wires are removed. It can be seen with an indicator screwdriver that on one there is a stronger glow (meaning phase), but on the other 2 there is a glow, but much less than on the first, on the third wire, respectively, there is less glow than on the second. What is it? Breakdown of a phase? And how in this case to connect the bell button, so as not to make a short circuit? Thank!